December 25, 2024

3 Methods of Building A Website on Go Daddy Hosting

building-website-for-business

Godaddy provides a flexible hosting platform to run your website and get the best out of your online identity. One of the most crucial element of successful website is to choose wisely the solution that works flawless for long term use. Otherwise failing to identify your expansion needs, you might need to invest more time and money in rebuilding advance version of your site.

methods-of-building-a-website

Methods of Building A Website On Go Daddy Web Hosting

First of all these methods are only applicable to normal business or personal websites. For complicated solution not all these methods will work. For example if you need a ecommerce capabilities then you might be interested in professional online store tools such as zencart, opencart, shopify etc.

1) – WordPress Based Website

WordPress is used over 23% of all websites on the world wide web and its demand is constantly growing over time. . You can move a wordpress website that is hosted elsewhere. This is not complicated, instead doable via simple to follow migration instructions. At the end of the process you will have your fully functional wordpress based website working on godaddy server. Godaddy provides a managed wordpress hosting that allows you easier website development with wordpress. You get a temporary path to preview your website before changing your domain nameserver to go live. This helps to make sure your wordpress website is all good to go online.

2) – Godaddy Website Builder Tool

This is probably the best solution for non-technical people who know nothing about creating their website. Go-daddy has created an in-house tool that assists in building your website in a extremely simple user friendly interface. As a website builder user, you simple follow on-screen instructions and go through drag and drop steps and then populating custom website content such as images, text etc, and end up in a fully working website. It will hardly take couple of hours to finish building a basic website for your online business. The flexibility of selecting from thousands of pre-built professional website templates or themes makes it extremely reliable tool for new site builders.

3) – Build A Website From Scratch

The third and the most widely used method of building your website is to do it from scratch. This is doable via hiring a developer or a web team that takes your custom requirements and builds the website around your needs. Among the three methods this is expensive but the returns are fruitful. On the other hand, this is most time consuming require constant feedback from you as a client. Building a custom website gives your liberty to develop applications that suits your business model. At the end of the development, you get a really professional looking website that represents your online business.


We have shown you the three supported pathways of website construction on go-daddy  platform. Now it is up to your custom business needs that leads you to select the right method of developing your website. Do it either the easy way or the hard way, not all sites can be built in easy way, so you might look in all these methods before finalizing the website development route.

Create and Restore Backups in Website Builder

Go-Daddy Website Builder makes life easier for website owner seeking to build a website, apart from the fact that it provides a fast paced environment to get your site online in the way you like it, there are many more attractive features for dummies without any technical knowledge of website management. One such feature is taking backups of website files and restoring back from a previously created one.

godaddy-website-builder-project-backup-restore-files

Five Automatic Backups Copies in Website Builder

Majority of site builders never remember to save website files by following the backup procedure. In order to avoid this mistake website builder has built-in system to create automatic backup of entire website whenever website is published. For added security, Go Daddy keep a record of five backups, so each publish action will enforce a new backup creation and older backup will move back in the queue and if there were already five backups in the queue the oldest one will be deleted. This way you always have access to last five backups.

What is included in a backup copy And Why Create One?

A website builder backup consist of exporting your selected theme settings, database records, all you pages data that includes text, images, audio and videos etc. The purpose of a website backup is to have access to old files in case of emergency, as we know website files are stored on web servers that run 24 hours a day and stays always ON, so there is always chance of hardware failure or software corruption that prove to be disaster for your hosted data. In case of harddrive failure all of its data will be lost and you will end up empty and all your important files will be destroyed. So this is a risk management procedure practiced by all website owners worldwide, everyone should follow it and always create and keep website project backups.  Web hosts use different techniques for assurance that your backup files are always out of danger, this includes RAID technology (harddrive data mirrored on multiple harddrives) and offsite backups (saving backups to remote location), making sure you always have access to your previously saved projects/ backups.

Manually Saving a Website Back Up

This is a simple four step process:

  1. Login to your website builder account.
  2. From Manage Menu, select Backup/ Restore.
  3. In the “Enter a name of this copy” field, type a name of backup file.
  4. Click Save Website

Restoring a Website from Backup History

This too is a four step process:

  1. Login to your Website Builder account.
  2. From the Manage menu, select Backup/ Restore.
  3. In the Restore a Previous Project area, click the Restore button fro the project you want to restore. The Restore button is located next to previously saved project file.
  4. To make a backup copy of your current website before restoring the saved copy, click OK. Restoration process will happen instantly.

How to Migrate Your Existing WordPress Site to Go Daddy?

Why Website Owners Migrate Website to Other Hosts?

Website migration is not a rare procedure that website owners practice through the world wide web. This can happen due to many reasons making members unhappy, the most common among these factors includes:

  • Frequent Downtime (website offline temporarily): All web server does require maintenance and websites hosted on it goes down for short period of time, this normally happens for couples of hours once a month. If it happens too often then customer will consider leaving the company.
  • Slow Servers: Placing too many websites in a shared host will result in poor share of server resources to the individual websites, this will result in slow page loads and lags during database data retrieval. This will have bad impact on website visitors which could result in losing business.
  • Poor Customer Support: A good customer relation is crucial in web hosting business since you leave a impact on your paying members. If you are not able to provide a satisfactory support in all matter (sales, billing, technical etc), then customer will start finding escape from your server.
  • High Hosting Fees: Another factor that makes customer move to other hosts providing same service in lower price. Web Hosts are always busy in introducing new packages and promotion offers, this forces more people to get interested in their services and leave their existing company.

Standard WP Migration Procedure

A standard WordPress Migration involves these steps:

  1. Transfer WordPress Files: This involves copying all files under your WP folder from old host to new host.
  2. Migrate the WP MYSQL Database: First you export the WP mysql data in sql format under and on the new host you simply import it, PhpMyAdmin is used for both import and export of mysql data at source and destination.
  3. Reconfigure WordPress to work with new server: This step is done by updating the wp-config.php file (present in WP root folder). Simply update the database name, user  and password information that match the new server.

go-daddy-wordpress-migration-procedure

WordPress Migration Process | How Go Daddy Transfers Your WP Website?

First of all you signup for a WordPress Managed Hosting account. Once your account sign up for WordPress account at go daddy is complete, you will need to submit migration request and provide your existing website access information, this normally includes WP control panel access info, ftp and database access. This service is free of charge and this is standard among all web hosts since this practice helps in getting more customers. This transfer will move your mysql database data, WP themes, plugins, images, videos, audio etc. The whole migration of WordPress website will take no longer than couple of hours. The best practice is to make sure there is minimum traffic loss and saving the entire website backup before initiating the move. In order to perform the migration, server support will follow the following steps:

  1. Custom plugin will be installed on your existing wordpress blog which will aid in migration of entire site
  2. All your word-press files and folders will be copied from existing site to go-daddy account using ftp file transfer.
  3. Your migrated wordpress site will be activated on a temporary URL which you can connect with your domain by editing name-servers at domain registrar.

So the conclusion is that you simply signup for WP hosting and  just “Leave it to the Experts!” to move your WP site to new location.

Create/ Add a New Go Daddy Email Account For Your Domain Name

This is probably the most frequently asked question for any website or domain owner and fortunately it is not hard at all to create your mail account under go daddy control page. You will be get going with your new email address in matter of few clicks. However after your new email address request is initiated, there is one small hurdle in activating the new email and it is that it takes around one and half hour before your mail account will be ready to use, this is average amount of time that go daddy server administration will need to process your new email account request.

create-godaddy-email-address

Steps to Follow For Go Daddy Mail

  1. Login to your “Account Manager” page
  2. From user account Dashboard click “Email”
  3. For free credit redemption, simply click “Set Up” next to domain under which you intend to create email account.
  4. Now click “Launch” next to this account for which you followed step 3
  5. Click “View All” to display all your existing email plans
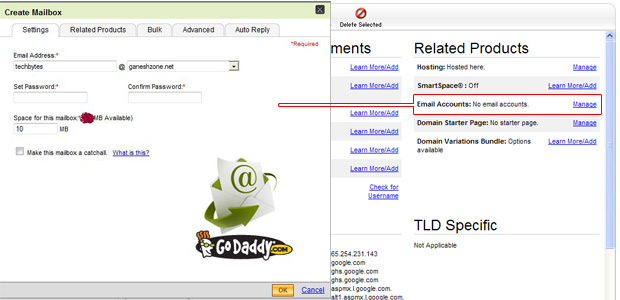
  6. Under your desired plan, click “Add” which will display the “Create Mailbox” Window.
  7. Under “Settings” tab, enter the following details:
    Email Address: enter first part or prefix of your go daddy email address.
    Set Password: Enter your webmail password (should be strong).
    Confirm Password: Re-enter password to verify.
    Space for this mailbox: Select appropriate space for email this email address
  8. Click “OK” to complete the email account setup.

Email Control Center will allow you to create as many wordspace email accounts as your desired, however not all are free of cost. Once your mail account is set up, you can login at url email.secureserver.net

Prepare/Transfer a Domain Name To Go Daddy Account

Due to competitive prices, millions of customers transfer their domains to Go Daddy from other registrars and get benefit from low prices offered by the domain giant. Either they do it through promo offers advertised on the site itself or by searching for coupon codes that give them good discounts.

thumb5

Let’s get back to the issue and understand how it is done. First be sure that there are no hard stuff involved in the transfer, simply follow these easy steps and your domain will be good to get transferred to Go Daddy account in shortest time possible.

Each domain registrar keep your domain in a lock state, so in order to transfer to another registrar you need to unlock/ release your domain at your current registrar and then authorize the Go Daddy to fetch the preferred domain.

Prepare Domain Name Transfer to Go Daddy

  1. Ensure that the administrative contact information of your Go Daddy account and the remote registrar is same. Match your email, street address and even your first last name. Bottom line is you have your contact info exactly same on both accounts (Go Daddy and the remote registrar). This is important to prove your identity and ensure security of your domain.
  2. Go to existing registrar (the domain loser) account and release/unlock your preferred domain from the domain settings.
  3. Next from the same remote registrar account create an authorization code aka EPP code or a transfer key. This code is large chunk of alphanumeric data which is encoded data for security of your domain and serve as the key to opening the domain lock.
  4. Login back to your Go Daddy account and purchase a domain name transfer by adding same domain name that you unlocked rom previous registrar.
  5. During the purchase, you will be asked to enter Name-Servers, You change them to be the same as you had earlier in previous account or mentioned new ones or ask Go Daddy to use the default park nameservers.

Things to Note Before Your Proceed With The Domain Transfer

  • If you purchased transfer for domain with any of the following TLDs: .ca, .eu, .se, .es and .uk the transfer procedure will be slightly different, more or less the same but there are minor changes in the procedure.
  • ICANN (The body that make rules for the domains globally) does not allow domain name transfer that are recently registered or had already been transfer in past two months (60 days).


Transfer Your Domain to Another Registrar

Internet is a free world for all of its users and the people responsible to run it favour this approach in order to benefit more population of the world. Domain registrars do the same with the online identity owners by allowing them to move their domains from one service provider to another. Go Daddy span at least 25% of world share in the domain management offers a very simple procedure to transfer the customer domains to other registrars.

move

Simply follow these quick steps to free your domain from Go Daddy system:

  1. Make sure that you use the same contact information at the remote registrar account that not just include the address, phone but also your email address.
  2. Unlock your domain name so it can be accessed by remote registrars.
  3. Check with the remote registrar if they require an authorization code to proceed with the transfer, if yes then generate one.
  4. Contact the new registrar to initiate the transfer process
  5. Authorize the transfer in your account at remote registrar website.
  6. Go Daddy will send you an automated email with instructions to accept the transfer, follow the link and then accept in order to approve the transfer.
  7. Your new registrar will be notified of the transfer status.
  8. Go Daddy will email you a confirmation once the transfer is completed which normally takes between 5 to 7 days.

Add New SubDomains From Your Go Daddy Account Manager

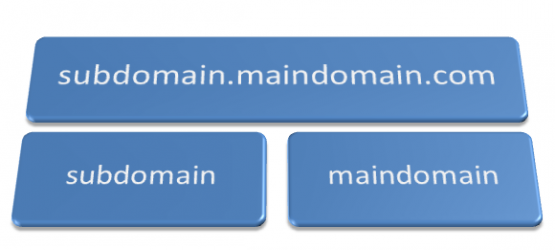
From time to time you will need to create new subdomains for your website in order to accomplish different goals. Go Daddy provides a very simple mechanism in the member interface that let’s you create new or manage existing sub-domains quickly.

main-sub-site

Adding a new subdomain will require you first login your account page, which you can do by visiting the Go Daddy homepage and clicking by clicking on the “Login To My Account” link. Simply enter username/ customer number and password combination in the login section.

Once you are on the MY ACCOUNT page simple follow these simple steps to add a new subdomain to your existing hosted website:

  • Under the main member area, click on the “WEB HOSTING” link to view your hosting plans, if you do not have one, simply choose a domain and add a hosting plan for that domain name.
  • For available hosting accounts, you will see a small green button that says “Launch”, you can click it to go to the hosting interface.
  • Next find and click “Hosted Domains” link which is under the “More” heading.
  • This will load all the available domains, simple click the domain that you want to extend.
  • Now click the “Add Subdomain” link.
  • Now you got access to the right controls for adding your new sub-domain. You will be prompted to enter a name and a folder path, by default the directory is created with the same name that you enter in the subdomain field.
  • In order to finish the process, click the “OK” button.

Adding Subdomains to Your Website From Simple Control Panel

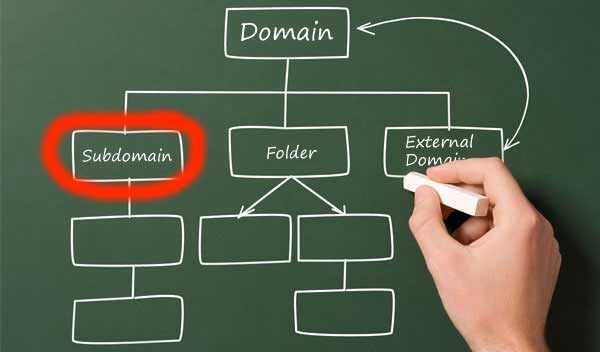
Managing a large website is cumbersome and having too many in a single section increases complexity of managing the site. Subdomains are great way to organize the website into order by creating small sites within your web domain. For example a separate sub-site for a WordPress blog, a separate section for e-commerce store.

subdomains

For dedicated server you can access your control panel by entering this url path in your web browser address bar: https://IPADDRESS:9999/
Next enter your server’s username and password which you created earlier when signed up for your server.
Finally click “Login” button.

Note: For admin pages always use https to connect using a secure connection.

Once you entered successfully in the Simple Control Panel, follow these steps to add a new subdomain:

  1. Click the link that reads “Domains” in order to view all the available domains on this dedicated server. If no domain is listed, you will need to add one before proceeding to a sub-domain set up.
  2. Click the “Edit” button next to the domain for which you are going to create a sub-domain.
  3. On the next page scroll to the section that says “Domain Configuration – Subdomain” and then click the “Add Host” button.
  4. This will load the screen to create your new subdomain, you will need to enter two things:
    1- name in “Server name” field
    2- directory/ folder path to files for this new sub-site.
  5. Finally click the “Save” button to finalize the changes.

Change Name Servers From Go Daddy Domain Manager

thumb3This is probably the most tricky aspect of managing your own domains at a domain registrar that give a very complex control interface with tons of options and for a average person who do not know the difference between a domain and hosting account will get confused easily. But that’s not entirely true, if you follow simple instructions you can easily connect your domain with your hosting account.

In order to perform a successful DNS change kindly follow the following steps:

  • First go to Go Daddy and login with your access info
  • Click on the “My Account” link from the top to reach your control panel interface
  • Click on the “DOMAINS” link under the products tab, which will reveal all the registered names
  • Click “Launch” button next to the domain for which you want to make a change, this will take you to the domain manager page.
  • Mouse-over on the yellow icon from the tool bar and then click on “Set Nameservers” or alternatively scroll down and do it from the link under Nameservers heading. This will open a popup overlay with options to make changes in your name server.
  • Click on radio button that reads “I have specific nameservers for my domains”, which will let you add the urls of your preferred name servers in the four text-boxes, though normally we change first two of these and leave the other two blank.
  • Enter NS urls that you got from your hosting company, most probably they will in this structure:
    ns1.hostingcompany.com
    ns2.hostingcompany.com
    If you do not know what to enter, it is best that you contact your hosting company by email or phone and inquire about the DNS settings.
  • Once you enter the correct values in the two input fields, simply click “OK” button to finish the change operation.

Upon successful completion, the linkage of your website name with your remote hosting account will take between 24 to 48 hours due to the information propagation through the entire internet.